使用命令行批量创建 KeePass 数据库。
最近需要创建多个 KeePass 数据库,但是一个一个手动创建太花时间了,后来发现原来 KeePassXC 内置有 CLI 命令行工具。路径在:/Applications/KeePassXC.app/Contents/MacOS/keepassxc-cli
创建 KeePassXC 数据库
语法如下:
printf "%s\n%s" "密码" "密码" | /Applications/KeePassXC.app/Contents/MacOS/keepassxc-cli db-create -p 文件名字.kdbx
命令详解:
db-create 是用来创建数据库的参数。
Usage: keepassxc-cli db-create [options] database
Create a new database.

Options:
  -q, --quiet                   Silence password prompt and other secondary
                                outputs.
  -k, --set-key-file <path>     Set the key file for the database.
  -p, --set-password            Set a password for the database.
  -t, --decryption-time <time>  Target decryption time in MS for the database.
  -h, --help                    Display this help.

Arguments:
  database                      Path of the database.
使用 -p 参数设置密码,在后面设置创建的文件名字,以 kdbx 结尾。
/Applications/KeePassXC.app/Contents/MacOS/keepassxc-cli db-create -p demo.kdbx
Enter password to encrypt database (optional):
Repeat password:
接下来会要求重复输入两遍密码,然后就创建完成了。
Successfully created new database.
使用 printf 命令预设好密码。
%s是格式代替符,会输出字符串。\n代表换行。- 后面引号的参数就是
%s要输出的内容。
printf "%s\n%s" "123456" "123456"
意思就是 %s 输出第一行密码 123456,然后 \n 换行,第二个 %s 输出第二行密码 123456。
设置 KeePassXC 数据内的项目
语法如下:
printf "%s\n%s" "KeePassXC密码" "密码" | /Applications/KeePassXC.app/Contents/MacOS/keepassxc-cli add "文件名.kdbx" --u "用户名" --url "链接" -p "标题"
命令详解:
add 是用来新增数据库项目的参数。
Usage: keepassxc-cli add [options] database entry
Add a new entry to a database.

Options:
  -q, --quiet                    Silence password prompt and other secondary
                                 outputs.
  -k, --key-file <path>          Key file of the database.
  --no-password                  Deactivate password key for the database.
  -y, --yubikey <slot[:serial]>  Yubikey slot and optional serial used to
                                 access the database (e.g., 1:7370001).
  -u, --username <username>      Username for the entry.
  --url <URL>                    URL for the entry.
  -p, --password-prompt          Prompt for the entry's password.
  -g, --generate                 Generate a password for the entry.
  -L, --length <length>          Length of the generated password
  -l, --lower                    Use lowercase characters
  -U, --upper                    Use uppercase characters
  -n, --numeric                  Use numbers
  -s, --special                  Use special characters
  -e, --extended                 Use extended ASCII
  -x, --exclude <chars>          Exclude character set
  --exclude-similar              Exclude similar looking characters
  --every-group                  Include characters from every selected group
  -h, --help                     Display this help.

Arguments:
  database                       Path of the database.
  entry                          Path of the entry to add.
- 在 add 参数后面需要设置一个数据库文件。
--u参数设置用户名。--url参数设置链接,如果没有链接,引号内可以留空,或者不使用这个参数。-p参数设置标题。
/Applications/KeePassXC.app/Contents/MacOS/keepassxc-cli add "demo.kdbx" --u "Admin" --url "https://dev-coco.github.io" -p "测试内容"
Enter password to unlock demo.kdbx:
Enter password for new entry:
接下来会要求输入数据库的密码,然后再输入项目的密码。
Successfully added entry 测试内容.
自动化生成器
首先,在 Excel 表格内按照下图第一行的表头设置好内容,链接为可选填项。

然后把 Excel 表格里设置好的内容复制粘贴到 KeePassXC 批量生成器 左边的输入框。点击生成按钮后,在右侧就会输出生成好的 Shell 命令。
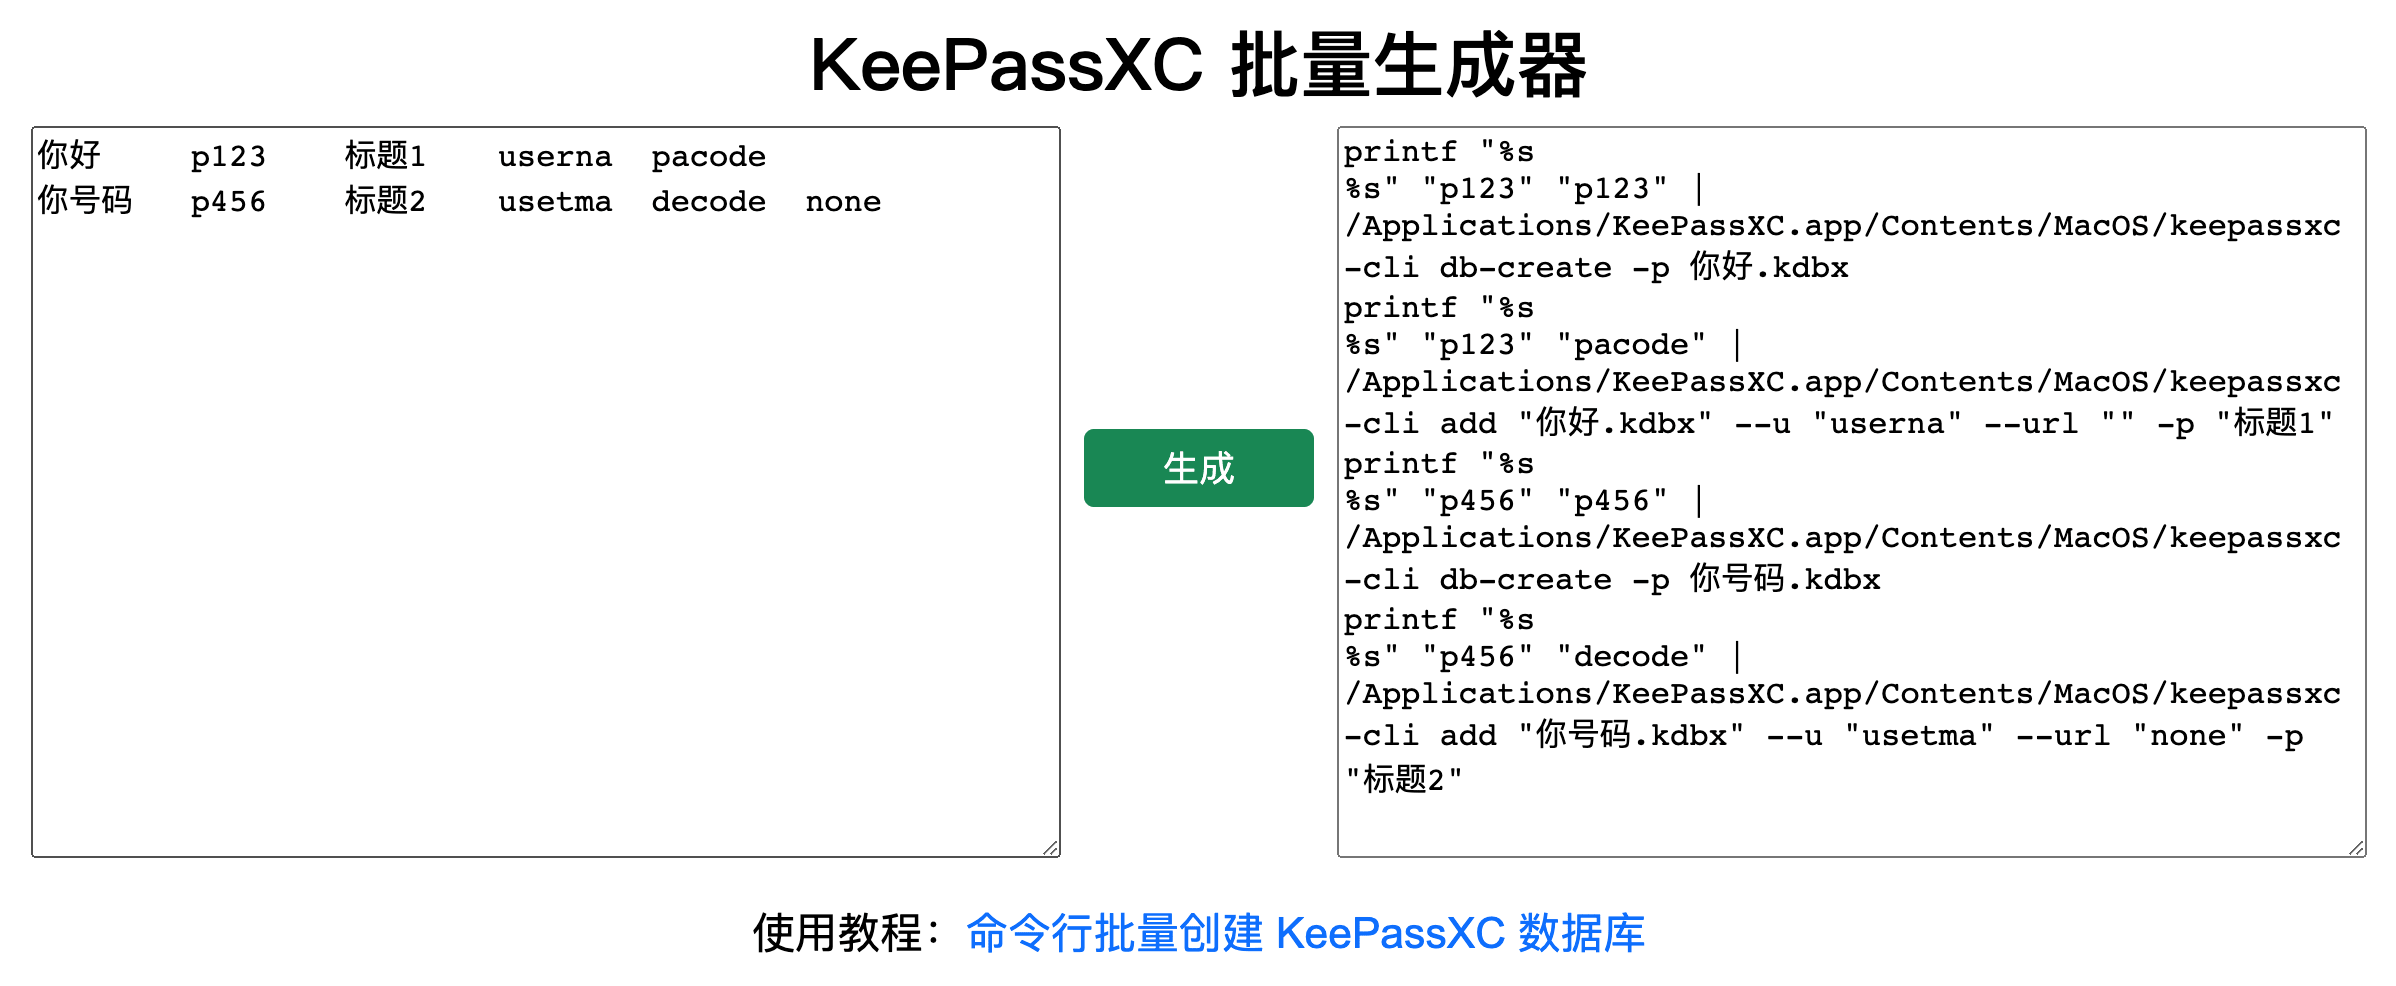
最后把输出的命令复制粘贴到 Terminal 里运行。在当前目录下就会批量创建设置好的数据库了。


